The Bitget exchange has been growing in popularity lately, and having used it myself, it’s easy to understand why. The fees are low, there’s no KYC requirement and the interface is user-friendly. I’ve never experienced any sort of delay when trying to send coins from the exchange. Every withdrawal request I’ve submitted has been instantly processed.
Now, while I do personally like the Bitget exchange, I would never keep a significant amount of crypto on there. I would never keep a significant amount of crypto on any exchange because, as the saying goes, “not your keys, not your coins”. There has been too many instances of centralized exchanges going bust and depositors losing everything.
I always recommend that people secure the majority of their crypto with a hardware wallet (like this one).
One thing that’s nice about the Bitget exchange is that you’re able to leverage your balance to get larger position sizes, which reduces the need to keep a significant amount of funds on there. Of course, using leverage introduces the risk of getting liquidated if the trade moves against you, but that’s what stop losses are for.
If you have no idea what any of these terms mean, don’t worry. It’ll all be covered in this Bitget exchange tutorial. Let’s start with the basics..
How to sign up for a Bitget account and make a deposit
The registration process is very intuitive. You basically just hit the sign up button, input your email and create a password. Use this link though if you want to get bonus on your first deposit and a discount on your trading fees.
Once you’ve created your account, the next thing you’ll want to do is make your first deposit. To do so, click for the little wallet icon at the top, then click the “deposit” button on the next page. Select the coin you want to deposit from the dropdown tab, copy the address, then send a small test deposit to make sure everything is working properly.
If you’re new to all this and don’t yet know how to send cryptos, this article will walk you through the process.
Once you’ve set up your account and deposited your coins, the next step is to place a trade.
How to trade on Bitget exchange
If you hover over the “trade” tab at the top, a dropdown menu will be presented which will show you various “futures” and “spot” trading options.

What’s the difference between futures and spot trading?
Typically, with spot, you own the underlying asset. If you want to send your coins/tokens off the exchange, you will need to do so from your spot account.
With futures however, you’re essentially putting up some collateral to be able to borrow coins/tokens that you don’t own.
For example, if you have some USDT in your futures account, and you see that Cosmos (ATOM) pumped 25% in a single day, you can use your USDT as collateral to short (sell) ATOM and profit off the retracement.
Not only that, but as mentioned above, you can use leverage (up to 125x on Bitget) to amplify your position.
How to trade in the spot market
Spot trading is relatively straightforward. Just choose the currency pair you want to swap between, then either hit the “buy” or “sell” button. You’ll be able to choose between a market order and a limit order. The difference between the two will be explained in detail below, but in short, a market order will initiate the trade immediately using the best price in the orderbook, while a limit order will allow you to choose a specific price at which you want to buy or sell the asset.
How to trade in the futures market
With futures trading, you’ll essentially be taking a loan from the exchange to amplify your position size. There will be a fee for the loan, but it’s relatively insignificant – especially if you sign up with this link as you’ll get a discount on your trading fees.
Transferring your coins
To trade in the futures markets, you’ll need to first initiate a transfer from your spot account to your futures account. To do this, just hover over the wallet icon, then select “spot” from the dropdown menu.
You’ll then be shown a list of your assets. Find the one you move to your futures account, then select “transfer”. You’ll see a popup window that looks like this..

If you want to trade in the USDT markets, you’ll need to send USDT (obviously). The same applies to USDC, or whatever coin you want to base your trades in (there’s currently a handful of options). The USDT and USDC pairings currently have the most action.
Alright, so once you have your coins moved over to your futures account, you’re ready to place some trades.
How to place trades – your options
The first (and perhaps the most important) point I want to address is that you need to check your leverage and margin mode before you place your trade. Make a mistake here and you can get absolutely REKT.
This is the section I’m referring to..
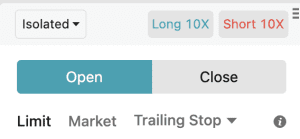
Let’s go over what we’re seeing here..
Isolated vs Cross
Where it says isolated, that dropdown menu has another option called cross. When isolated is selected, your losses will be limited to the size of that particular trade. With cross, your losses aren’t limited to your margin on that particular trade, but rather, your entire account balance.
You’ll have a larger buffer before being liquidated, but in my opinion, it’s just not worth it. I personally stick to isolated to mitigate my risk.
Leverage
The second area that gets a lot of beginners into trouble is the leverage. The leverage is set where it says long 10x and short 10x. Be careful though, because the default settings on a lot of coins is 20x.
With a 20x leverage, essentially what that means is that if the trade moves against you by just 5%, your position will get liquidated. The upside to using a 20x leverage is that you’ll be able to turn $100 into a $2000 position.
At the time of this writing, Bitget allows for 125x leverage. High risk, high reward – though I certainly don’t recommend that.
Also, the more leverage you use, the higher your borrowing fees will be.
I personally use about a 10x when trading Bitcoin against a USD pairing, and when trading altcoins, I’ll typically use less (5-7x) due to the increased volatility.
Limit Orders
A limit order a great way to place an order in advance before the price reaches your desired buy/sell area. For example, if I notice a big resistance zone at $30,000, and the current price is $28,500, I can set a limit sell order at $30,000 to attempt to short that resistance level, without having to waste time watching the chart, waiting for the opportunity.
The advantage of buying (longing) at support levels and selling (shorting) at resistance levels is two-fold. There’s a decent chance the price will turn around in those regions, and if you’re wrong, you know quickly if your trade idea has been invalidated and you can cut your losses without taking too big of a hit.
As you place your orders, you’ll also have an option to set a “take profit” and a “stop loss”, enabling you to set all the parameters of the trade before it’s even executed.
Market Orders
A market order will execute your trade immediately at the best current price available in the order-book. Good impatient traders who don’t want to wait to get into the action.
Trigger Orders
A trigger order will allow you to set a price at which your order will be triggered. It’s essentially a limit order that sends a signal for an order to be placed.
Trailing Stop
A trailing stop is a very useful tool you can use to protect your capital. It’s essentially a stop loss that will move based on the price action. For example, let’s say you buy (long) Bitcoin at $25,000, and you don’t want to risk more than 3% on the trade. You can set a trailing stop, and the price starts rising, the stop loss will rise along with it, tracking the price. If at any point the price drops by 3%, your stop loss will activate to either secure your profits or cut your losses.
When setting up a trailing stop, you’ll see a few different options to choose from..
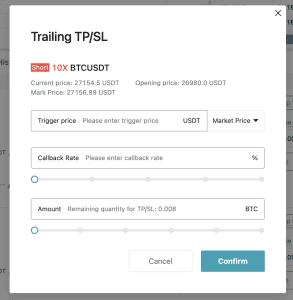
The trigger price is exactly what it sounds like. It’s the price at which you want the stop loss to become active. If you decide to leave that section blank, the stop loss will be activated immediately as soon as you click the “confirm” button.
The callback rate just refers to the percentage you want the stop to be in relation to the price. Based on the example above, you would just put 3 in that section.
The amount gives you the option to close the entire position, or only a certain percentage of it.
Position Monitoring
Once your position is active, the details will be displayed below the chart and order book. It’ll look something like this..

The most important thing to pay attention to is the “Liq.Price’ (liquidation price). In this particular example, it’s at $29,542. What that means is that if the price reaches that amount, I will lose my entire investment in the position. Since I’m using “isolated” instead of “cross”, my losses are limited to just the $21.58 (listed as the margin).
If you didn’t set a stop loss, and the price is nearing your liquidation, you have a couple options. You can either accept the loss, or you can try to defend it. To defend it, you can either add more to the position (increase the margin) by placing another order using the same parameters (BTC short with 10x leverage in this example), or you can accept a loss on a small percentage of the position. Both ways will give you more of a buffer on the liquidation price.
To close a small amount of the position, click on the box under “close amount”. Doing so will bring up a dropdown menu.
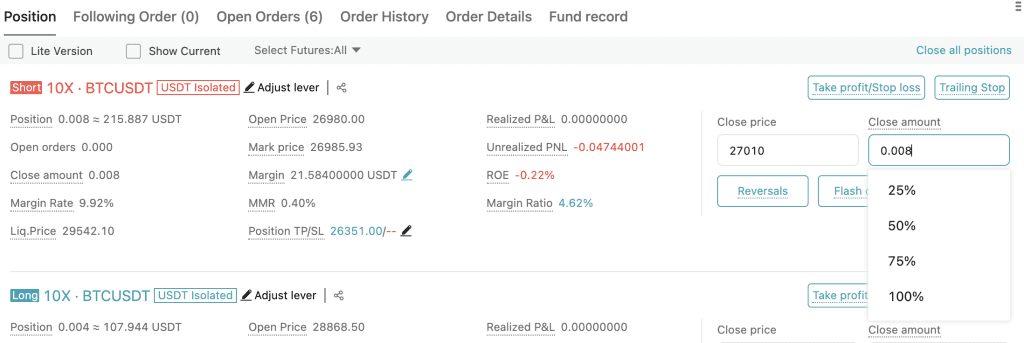
You can select a percentage, or you can manually input the amount you want to close. Sometimes taking a loss on 25% of the position will help you avoid liquidation, and ultimately turn it into a profitable trade if it starts moving in your favour.
Summary
I hope you found this Bitget exchange tutorial helpful. To reiterate though, I would never suggest keeping a significant amount of funds on ANY centralized exchange. I personally use Bitget, and I love the functionality and interface, but considering what recently happened with FTX (and several exchanges before that), I would exercise caution and recommend that you keep the bulk of your crypto holdings on a secure hardware wallet.
In other words, don’t trade (and gamble) with all the crypto you own. Keep a holding portfolio, and a trading balance. The coins on your hardware wallet can be sold when you feel that the market has reached a cycle peak, and the trading balance can be used for shorter term trades to try to build up that holding portfolio. That, to be, seems like the best strategy.


